A Complete Guide to Deploy your IOS App | AdHoc Custom Deployment ( Skip Testflight and Test your app on the go )| Part 2/4.
This article is a follow-up to part 1 of A Complete Guide to Deploy your IOS App | Introduction | Part 1/4. In part 1, we discussed all the ways of deployment we will cover in this series. To get insight into this series, please check Part1.
This part is specific to guide you through IOS app deployment using a custom ad hoc process.
Why custom ad hoc build?
If we do not want to go through the Testflight process of deployment which requires you to purchase an Apple developer certificate, you can go through this process. This process will skip the Testflight process and will help you directly extract an IPA file that we can use in your app. As we go further, we will see every step in detail.
As discussed in part 1, to get insights into key terminologies of deployment, like, signing certs, app groups, bundles, etc, check part 4 (publishing on Nov 12, 2023).
Let's go…

Step 1: Setting things up
- Make sure your Xcode version, IOS version and macOS version should be in sync and supporting each other. (No compatibility issues)
- Enable Developer Debugging in iPhone. You can enable this by going to Privacy and Security in your settings. This step might vary depending on your IOS version.

3. Open your app in XCode. To do this, it is very important to open the workspace file which is inside the IOS folder. Do not open the .proj file.
4. Login with an Apple developer program account in XCode. This does not require you to buy an Apple certificate. You can log in by going to Settings and then Accounts. Make sure you have logged in with the account which has the developer program enrolled.
5. You need the UDID of the users you want to offer this app for testing. In simple terms, UDID uniquely represents an Apple phone. This is needed for beta testing so that a specific set of users will only have access to the app.
Finding the UDID of your phone
- Connect your phone to your Mac to pair up in XCode. You can use a cable or wirelessly connect it.
- Once you plug your phone into Mac, a pop-up will come that will prompt you to trust the computer. Please select Yes.
- On the top middle section of XCode, you will see your connected device name. Open the dropdown and look for Manage Run Destinations.
- Here, in the popup like below, you will get the Identifier option, which is our UDID.

Step 2: Setup app groups and bundles
This is a very vast step to cover. Apple has its own policies and rules for you to build an IOS app for deployment. We will cover all of the details in Part 4. This part will help you to get direct insight into each steps in simple ways.
- Once we have the workspace ready in XCode as done in Step 1, sub-step 3, click on the project parent folder name.
- Once clicked, you will see options for General, Signing and capabilities, build settings, etc.

3. Now, In Signing and Capabilities, Fill below details at must.
Fill in the Below Details in Signing And Capabilities.
- Team — this should be your account name.
- Bundle Identifier — Add a unique identifier name. Note this down, you will need this in the below items as well. (Details and why in part 4 :) )
- App Groups — Add a unique group name. A group can contain multiple bundles. (Details and why in part 4 :) )
- Targets — On the left side, you should see a Target Column. The data you filled in above should be for the first option. Please fill same details, exactly the same, in the other 2 options. They could be Test and BroadCast Extension options.
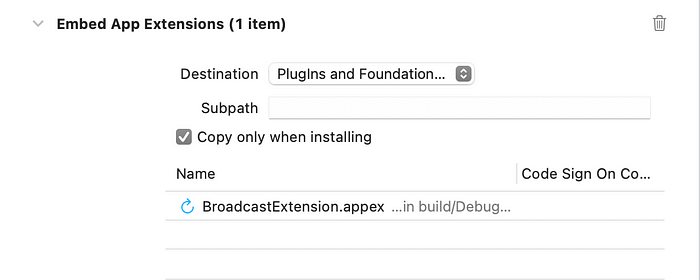
- Check Embed App Extension (very important) — Select the First Target and then go to Build Phases. Now, expand the Embed App Extension Accordion and check the option Copy only when installing.
Step 3: Update the App Name and App Icon
This step is optional in deploying using a custom build, as it's only required for Testflight deployment. But, it is good to have it here as it will uniquely identify your app on your phone.
- Open Information Property List file (info.plist)
- Update App Name — Look for the key ‘Bundle Display Name’ and update the app name here. You can add a string as well as a variable here.
- Update App Icon — Open or create a .xcassets file. This file will be under your project folder. More details below.
Updating App Icon :
- Update the App Icons folder name. Usually, it is set to ‘AppIcon’. You can change this to your desired name. Once renamed, you have to update this name in the Info.plist file under the App Icon key.
- Now, create your App Icons from your desired Apps. To simply create app icons, I would use the App Icon Generator app, which provides you with app icons of different resolutions needed for your IOS App. It helps you extract the .xcassets folder and directly put it here.
Step 4: Create an archive of the App
This step involves verifying your App groups and bundle names based on your Apple account. They should be unique as mentioned above. We have already done this step above.
Then it creates a build for the App. I have covered all the steps needed to avoid any errors. In case of any error, please search on Google once or comment here in this post. I will check in my Error Dictionary and get back (Working on this — releasing soon — An App that will be a dictionary of errors which can help devs to work faster).
Then it creates an archive. Lets see the steps involved.
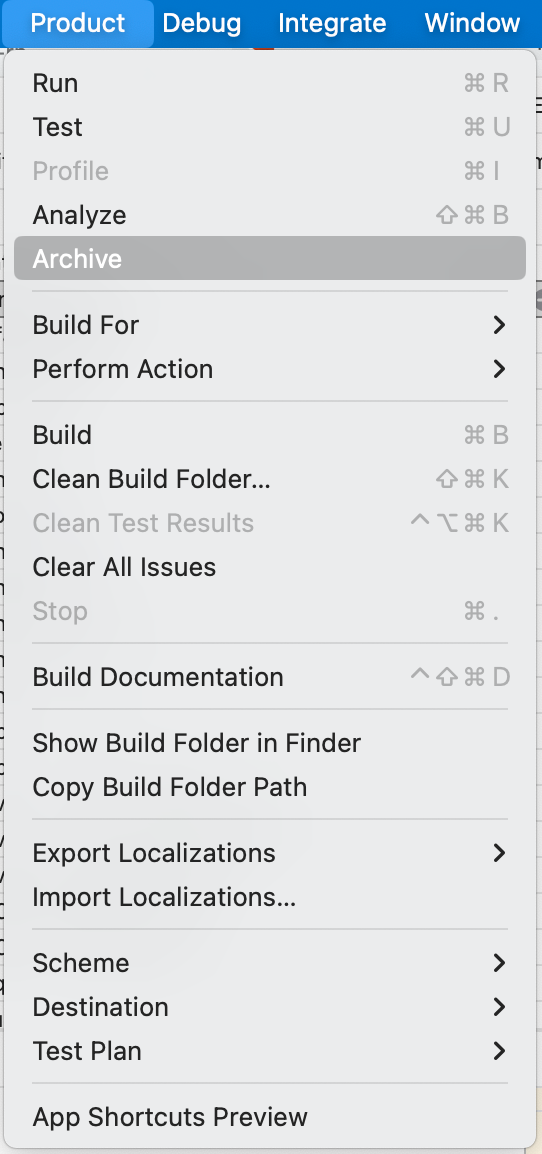
- Go to Product and click on the Archive option.
2. A process will start which will build the app and then archive it.
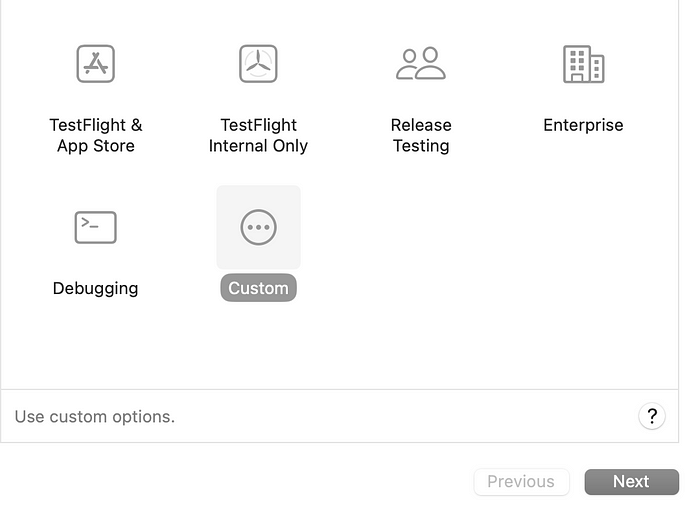
3. Once Archived, you will see a popup like below. Here it will ask you to select an option for distribution. We will go through the custom way in this part and will see the Test flight way in the next blog.
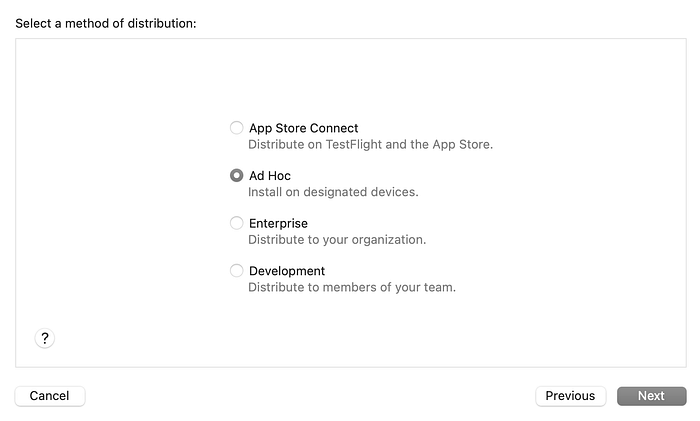
4. Now Select the Adhoc method of distribution.
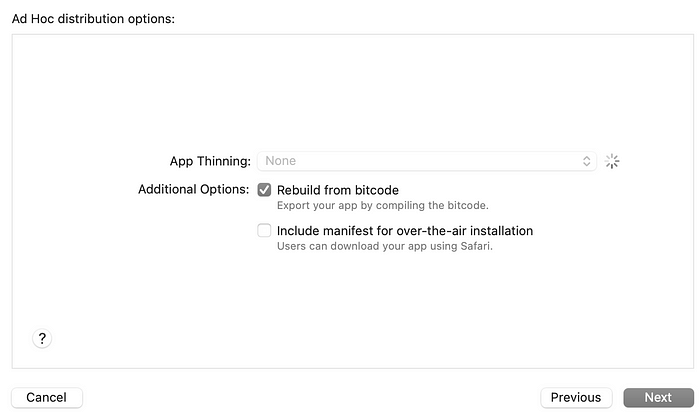
5. Now Keep the App Thinning as none.
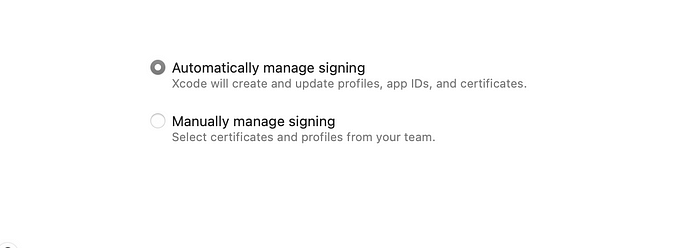
6. Now Select Automatically manage signing.
7. Once done, it will embed the app and will ask you to extract the archive.
8. Download the archive and look for the .ipa file.
Step 5: Distribute the App and set UDID
- Once we have the IPA file with us, we have multiple options to install the app on the designated devices.
- Before distribution, please add all the UDIDs to the Apple developer account.
- For the above step, you can add the Users using their UDID in Apple Connect here.
- Once Users are added, you can distribute the app using any wireless app distribution third-party app or you can directly send them the ipa file.
- To send wirelessly and make the app available through a QR Code or link, follow step 6.
Step 6: Make the app available on a QR or a Link using Diawi.
- Upload your .ipa file here.
- Once done, it will provide you with a QR code and a link.
- You can share the link or the QR to all the designated users to Test the App.
- And we are done :)
Hopefully, this would have helped you to get insights into the ad hoc distribution process.
Coming up next in this series :
- Part 3 | Sunday, Nov 5, 2023 | — IOS Deployment process using Testflight
- Part 4 | Sunday, Nov 12, 2023 | — More Insights into App groups, App bundles, Signings, etc.
Each part will have backlinks for easier and simpler navigation.
This blog is always expanding with more concepts and as I learn more, I will keep adding them here.
Please comment and follow for any questions, feedback and suggestions.
Thanks,
Hariom Sinha | Developer | Learning And Growing
New Blog drops every Sunday