Create a custom ESLint Plugin — In a Simple and easy way
ESLint is one of the tools to analyse problematic patterns found in the JS Code. Rules are configurable and new rules can be added in the ESLint configuration based on our requirements.
We have used many ESLint plugins to identify any code errors in JS. In this article, I will guide you to create your own custom ESLint plugin.

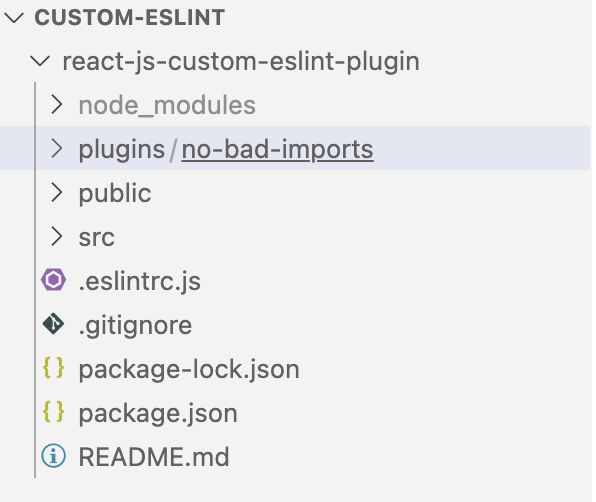
My Project Structure —

Step By Step Guide :
- Create a React app using CRA :
npx create-react-app react-js-custom-eslint-plugin2. Install basic plugins to run ESLint :
npm install eslint eslint-plugin-react eslint-plugin-react-hooks --save-dev3. Add a script to run ESLint :
./package.json

   "lint": "eslint src/**/*.js"
3. Run the app and test the ESLint work
npm run lint4. You will see below errors from ESLint :

5. Now let's create your own custom ESLint Plugin.
Important Note:
For a custom ESlint plugin, we need to create a plugin folder with a package.json in it.
This plugin will have its own rules.
We need to add this plugin to the project’s global .eslintrc file.
Finally, we must add this plugin as a dependency in our package.json file.
6. Create a plugins folder. Plugins folder can have multiple numbers of custom plugins, so create a subfolder for your own plugin. Remember, folder names can be anything.
The custom plugin folder should have a package.json file and an index.js file that will contain the rule.
You can also initialise the plugin folder by running:
npm init
7. Add your custom rule to the index.js file.
Important Note: This plugin will read imports in each file and will scan for imports with source “file/bad-import”. If there are any occurrences of this source in any of the imports, it will complain.
react-js-custom-eslint-plugin/plugins/no-bad-imports/index.js
-------------------------------------------------------------

module.exports = {
  rules: {
    "no-bad-imports": {
      create: function (context) {
        return {
          ImportDeclaration(node) {
            if (node.source.value === "file/bad-import") {
              context.report({
                node,
                message: "Do not use bad imports",
              });
            }
          },
        };
      },
    },
  },
};
react-js-custom-eslint-plugin/plugins/no-bad-imports/package.json
-----------------------------------------------------------------
{
"name": "eslint-plugin-no-bad-import",
"version": "1.0.0",
"description": "",
"main": "index.js",
"scripts": {
"test": "echo \"Error: no test specified\" && exit 1"
},
"author": "",
"license": "ISC"
}Important Note: Plugin name should start with prefix — “eslint-plugin-”
8. Now add this plugin to the project’s global .eslintrc file.
react-js-custom-eslint-plugin/.eslintrc.js
------------------------------------------

module.exports = {
  env: {
    browser: true,
    es2021: true,
  },
  extends: [
    "eslint:recommended",
    "plugin:react/recommended",
    "plugin:react-hooks/recommended",
  ],
  parserOptions: {
    ecmaVersion: 12,
    sourceType: "module",
    ecmaFeatures: {
      jsx: true,
    },
  },
  plugins: ["react", "react-hooks", "no-bad-imports"],
  rules: {
    "no-bad-imports/no-bad-imports": 2, // 0 : OFF, 1 : WARN, 2 : ERROR
  },
};
Important Note: We can have three states for a custom rule in eslint.
0 — OFF
1 — WARN
2 — ERRORAlso,
rules object structure —
pluginName/ruleName : STATE
9. Now, at last, add this plugin as a dependency to the project.
react-js-custom-eslint-plugin/package.json
------------------------------------------

{
  "name": "react-js-custom-eslint-plugin",
  "version": "0.1.0",
  "private": true,
  "dependencies": {
    "@testing-library/jest-dom": "^5.17.0",
    "@testing-library/react": "^13.4.0",
    "@testing-library/user-event": "^13.5.0",
    "react": "^18.2.0",
    "react-dom": "^18.2.0",
    "react-scripts": "5.0.1",
    "web-vitals": "^2.1.4"
  },
  "scripts": {
    "start": "react-scripts start",
    "build": "react-scripts build",
    "test": "react-scripts test",
    "eject": "react-scripts eject",
    "lint": "eslint src/**/*.js"
  },
  "eslintConfig": {
    "extends": [
      "react-app",
      "react-app/jest"
    ]
  },
  "browserslist": {
    "production": [
      ">0.2%",
      "not dead",
      "not op_mini all"
    ],
    "development": [
      "last 1 chrome version",
      "last 1 firefox version",
      "last 1 safari version"
    ]
  },
  "devDependencies": {
    "eslint": "^8.53.0",
    "eslint-plugin-no-bad-imports": "file:plugins/no-bad-imports",
    "eslint-plugin-react": "^7.33.2",
    "eslint-plugin-react-hooks": "^4.6.0"
  }
}
10. Now run the plugin and test it.
npm run lint11. Sample App.js
import logo from './logo.svg';
import './App.css';
import BadImport from "file/bad-import";

function App() {
  return (
    <div className="App">
      <header className="App-header">
        <img src={logo} className="App-logo" alt="logo" />
        <p>
          Edit <code>src/App.js</code> and save to reload.
        </p>
        <a
          className="App-link"
          href="https://reactjs.org"
          target="_blank"
          rel="noopener noreferrer"
        >
          Learn React
        </a>
      </header>
    </div>
  );
}

export default App;
Here, we have added a bad import —
import BadImport from "file/bad-import";This bad import should be caught by our custom Lint.
Important Note: Remember, our plugin uses AST to traverse the nested file and read imports. You can read more on this here — AST Explorer.
Output :

Here we go, we are able to find the usage of bad imports in our Project.
Links And References :
Thanks,
Hariom Sinha | Developer | Learning And Growing
New Blog drops every Sunday
